Introduction
This tutorial shows how to make applications with the 2D physics framework Pymunk in an object-oriented programming style.
About the naming of variables
Before we get started, get familiar with some conventions used in this tutorial. In order to make the programs simple and short, we will use short variable names.
bstands for Bodycstands for Constraintsstands for Shape
An important class is the Vec2d class which indicates either
the absolute position of a point in space, or the direction
vector between two points.
pstands for positionvstands for vector
We could define a vector as the difference between two points in space:
v = p1 - p0
A final s serves as a plural marker.
bsis a list of bodiespsis a list of positionsvsis a list of vectors
We can use the plural marker in a loop structure such as:
for b in bs:
    print(b)
The static body is used frequently, so we give it the short name b0
b0 = space.static_body
The abstract Body
The Body class describes the physical aspects of an objects.
These aspects cannot be seen, but describe how it moves.
Six properties describe the state of a body
mass- how heavy it ismoment- it’s resistance to rotationposition- it’s spatial locationangle- the current orientationvelocity- how fast and in which direction it is movingangular_velocity- how fast in which direction it is rotatting
A bouncing ball
We start this tutorial with a simple bouncing ball simulation.
The first thing we need to do is to import the pymunk and the pygame module:
import pymunk
import pymunk.pygame_util
import pygame
Then we initialize the Pygame module and define the screen surface where
we are going to draw the simulation result. Pymunk comes with a simple
draw option which can be used for quick prototyping:
pygame.init()
size = 640, 240
screen = pygame.display.set_mode(size)
draw_options = pymunk.pygame_util.DrawOptions(screen)
The 2D physics simulation takes place in a Space object.
We define space as a global variable and assign it a gravity vector:
space = pymunk.Space()
space.gravity = 0, -900
To create a fixed ground for our object we create a Segment shape
attached to the static body b0.
In order to make the ball bounce, we give it an elasticity of 1:
b0 = space.static_body
segment = pymunk.Segment(b0, (0, 0), (640, 0), 4)
segment.elasticity = 1
Next, we create a dynamic body and give it a mass, moment and position:
body = pymunk.Body(mass=1, moment=10)
body.position = 100, 200
Then we create a Circle shape and attach it to the body:
circle = pymunk.Circle(body, radius=20)
circle.elasticity = 0.95
Finally we add the body, circle and segment to the space.
Now we are ready for simulation:
space.add(body, circle, segment)
In the last part we start the Pygame event loop. The only event we are going to detect is the QUIT event:
running = True
while running:
    for event in pygame.event.get():
        if event.type == pygame.QUIT:
            running = False
In the latter part of the event loop we draw the obejcts.
First we fill the screen with a gray background color.
Then we draw the two objects with the space.debug_draw() function,
call the display update function,
and finally step the simulation forward by 0.01 time units:
    screen.fill(GRAY)
    space.debug_draw(draw_options)
    pygame.display.update()
    space.step(0.01)

pygame.quit()

Creating an App class
To simplfy the tutorial examples we will create a reusable App class
which will run the simulation. This class will:
- initialize Pygame
- create a
screenobject - create a
spaceobject - set the draw option
- run the event loop
- draw the objects to the screen
Here is the class definition with the constructor method:
class App:
    def __init__(self):
        pygame.init()
        self.screen = pygame.display.set_mode((700, 240))
        self.draw_options = pymunk.pygame_util.DrawOptions(self.screen)
        self.running = True
The App class has a run() method which runs the Pygame event loop:
def run(self):
    while self.running:
        for event in pygame.event.get():
            if event.type == pygame.QUIT:
                self.running = False
                pygame.image.save(self.screen, 'intro.png')

        self.screen.fill((220, 220, 220))
        space.debug_draw(self.draw_options)
        pygame.display.update()
        space.step(0.01)

    pygame.quit()
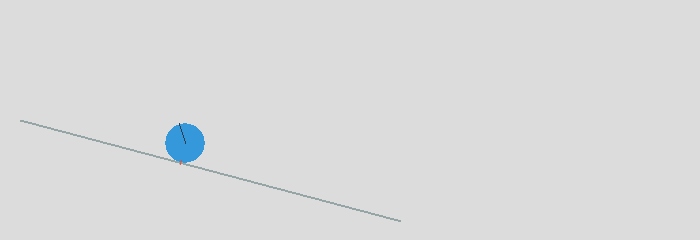
A ball rolling down slope
We can now import pymunk, space and the App class:
from intro import pymunk, space, App
Let’s define an inclined segment and give it friction:
segment = pymunk.Segment(space.static_body, (20, 120), (400, 20), 1)
segment.elasticity = 0.5
segment.friction = 0.5
The circle shape also needs friction, in order to roll. Whithout friction it would just glide down the slope:
circle = pymunk.Circle(body, radius=20)
circle.elasticty = 0.5
circle.friction = 0.5
space.add(body, circle, segment)
Finally we instantiate the app and call the run() method:
App().run()
A block sliding down a slope
The Poly class has a method to create box shapes.
Without elasticity it slides down the slope:
box = pymunk.Poly.create_box(body, (50, 50))
space.add(body, box, segment)

A block tumbling down a slope
Now we add elasticity to the box shape. It tumbles down the slope:
box = pymunk.Poly.create_box(body, (50, 50))
box.elasticity = 0.95
space.add(body, box, segment)

A ball inside a box
In order to draw a closed box where objects can bounce, we must get the 4 corner points. From those we can create 4 segments. We give them an elasticity of 0.999 as a value of 1 or larger can lead to an instable system:
pts = [(10, 10), (690, 10), (690, 230), (10, 230)]
for i in range(4):
    seg = pymunk.Segment(space.static_body, pts[i], pts[(i+1)%4], 2)
    seg.elasticity = 0.999
    space.add(seg)
In order to give the ball an inital lateral movement we apply an impulse vector of (100, 0) to it at initialization:
body = pymunk.Body(mass=1, moment=10)
body.position = (100, 200)
body.apply_impulse_at_local_point((100, 0))

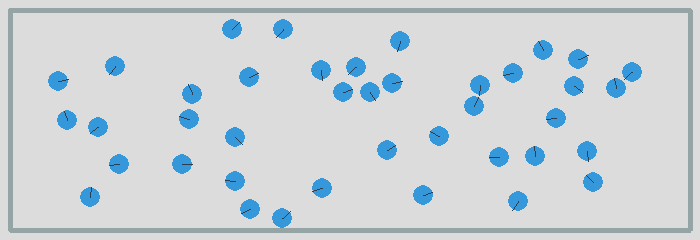
Many particles in a box
In order to simulate many particles in a box, we first turn off gravity. The we create a large number of particles at random location and give them random impulses as a starting movement:
space.gravity = 0, 0
for i in range(40):
    body = pymunk.Body(mass=1, moment=10)
    body.position = randint(40, 660), randint(40, 200)
    impulse = randint(-100, 100), randint(-100, 100)
    body.apply_impulse_at_local_point(impulse)
    circle = pymunk.Circle(body, radius=10)
    circle.elasticity = 0.999
    circle.friction = 0.5
    space.add(body, circle)
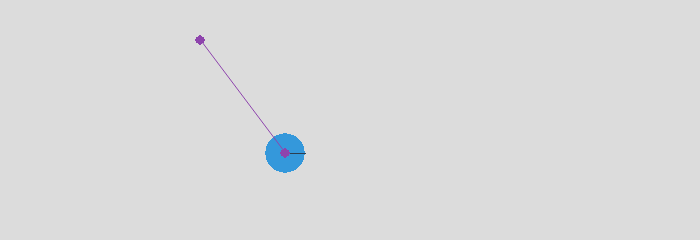
Pin joint
A PinJoint links two bodies with a solid link or pin. For all static points of attachement
we use the same space.static_body which has its default position at (0, 0):
b0 = space.static_body
As the dynamic body we place a sphere at (100, 100):
body = pymunk.Body(mass=1, moment=10)
body.position = (100, 100)
circle = pymunk.Circle(body, radius=20)
The PinJoint methode takes 2 bodies and their local positions as argument.
We place the static body b0’s anchor at (200, 200) and leave the dynamic body at its default anchor
of (0, 0). This creates a pin between static point (200, 200) and dynamic point (100, 100):
joint = pymunk.constraint.PinJoint(b0, body, (200, 200))
Due to gravity, the pendulum starts swinging.
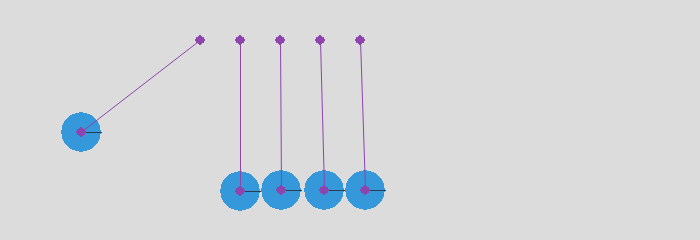
Double pendulum
If a moving eleastic pendulum hits another pendulum of the same mass, the energy is entirely transferred to the second object.